Stained Glass in the current Middle Ages
by Lord Conor
(Subedei Qorchi)
Stained Glass! That wondrously beautiful art form that transforms pieces of colored glass into intricate masterpieces. It adorns our places of worship, our homes, even our places of business. But what really is stained glass? And more importantly, is it period?
The term "stained glass" is misleading, used as a popular name for the glass used in making windows with colored glass. Stained (painted) glass is only one of the many types of glasses used for this purpose1. Although painting on both clear and colored glass is still done today, it is rapidly becoming a lost art primarily practiced by restoration artists.
Stained glass is most certainly period. A 12th century monk using the pseudonym, Theophilus, described the procedure for making stained glass windows in a "how to" manual for craftsmen. He wrote:
"If you want to assemble simple windows, first mark out the dimensions of their length and breadth on a wooden board, then draw scroll work or anything else that pleases you and select the colors that are to be put on it. Cut the glass and fit the pieces together with a grozing iron. Enclose them in lead [cames], putting in nails and solder on both sides. Surround with a wooden frame, strengthen with nails and set it up a place where you wish." 2
Not all stained glass in the original Middle Ages was clear glass with figures painted on it. The glass artisans in the original Middle Ages did have colored glass available to them. A metal salt, called a pot metal, was added to the mixture to make the colored glass. To make glass, a mixture of clean sand and beechwood ashes was melted in a ceramic pot-like crucible. An appropriate metal salt (such as copper to get green glass) was added to the mixture in the pot. Thus the term pot metal. If one were to follow only the information provided by Theophilus, it might look as though the colored glass was produced "by accident" due to impurities in the sand or beechwood ashes, or by oxidation occurring in the furnaces. However, other sources of the period3 and later4 (but still in SCA period) provide a more complete "recipe" for "purposely" getting colored glass.
The steps necessary to create a stained glass window are basically the same in both the original and current Middle Ages. Specifically you would:
The techniques used aren't so much different as improved. For example, a window is framed with wood. In the original Middle Ages they used nails to hold the window in the wooden frame. In the current Middle Ages, glazing putty or window caulking is used. Glazing putty and window caulking not only lasts longer, it's also more waterproof and attaches the window to the frame more securely.
The tools used are vastly improved also. For example, to cut the glass in the original Middle Ages, the glass artist would heat an iron that has a wedge-shaped tip in a fire to red-hot and touch the tip of iron to the glass where he wanted to cut. If a crack didn't develop immediate, he would wet his finger with spit, rub the glass on the spot he wanted to cut with his wet finger and then touch the iron to the glass with the red-hot tool to get a crack in the glass. When a crack appeared, he would draw the cutting tool along the pattern line. He would do this until the piece was cut. As you can imagine, this was extremely inaccurate. The glass artist in the current Middle Ages uses a glasscutter with a carbide steel wheel. The wheel is "rolled" on the surface of the glass, following the pattern line, producing a score line on the glass. The glass is then "broken" off along the score line. If used properly, the glasscutter will produce a more accurate cut, allowing the glass artist to create curved cuts as well as straight cuts.
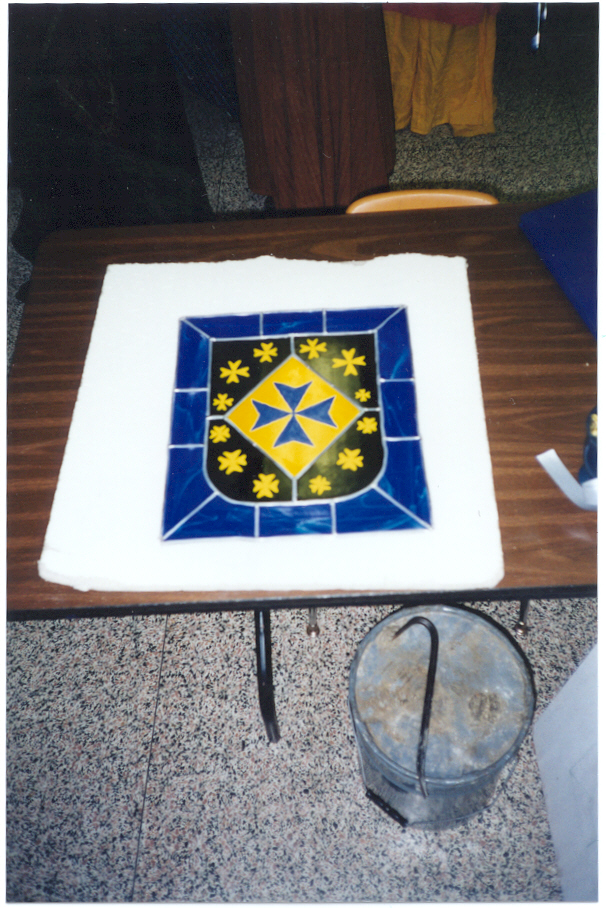
So, armed with a copy of the Theophilus work and having some 5 years experience in working in stained glass (the last year as an apprentice to a master artisan5), I've attempted to produce a piece using, where practical, the techniques of the 12th century. The subject I selected for this project is my arms, which is emblazoned:
Sable crusily Or Maltese, a Maltese cross azure on a lozenge Or
Each step in the project will have a detailed explanation of the process used in the 12th and 20th centuries. I'll then explain how I completed the step.
Creating the pattern and selecting your colors
The first thing that needs to be done is to create your pattern. This is the most important phase of any stained glass project. A design that isn't carefully thought out may cause you to "redesign as you go", causing you to waste time, energy and supplies. Take your time with this.
As you design your window, you should be thinking about the colors that you want to use. Poorly matched colors or shades can make the best design look amateurish. If you're not too artistically inclined, learn! Get the opinion of someone not involved with art or stained glass. There isn't really that much of a difference between the 12th century and the 20th century in color and glass selection. The 12th century artists did have colored glass (black, blue, green, yellow, red, purple and white) as well as clear glass. The 20th century artist has a much wider selection of colors and shades to choose from as well as a variety of textures. Where the 12th century artist may have had to use paint to get a color not available in glass, the 20th century artist should be able to get the colored glass. The 12th century artist also painted on the glass to attain shading and highlighting. Once again the 20th century artist could get a multi-colored glass and use the glass' transition from light to dark (or vice versa) to get the same effect.
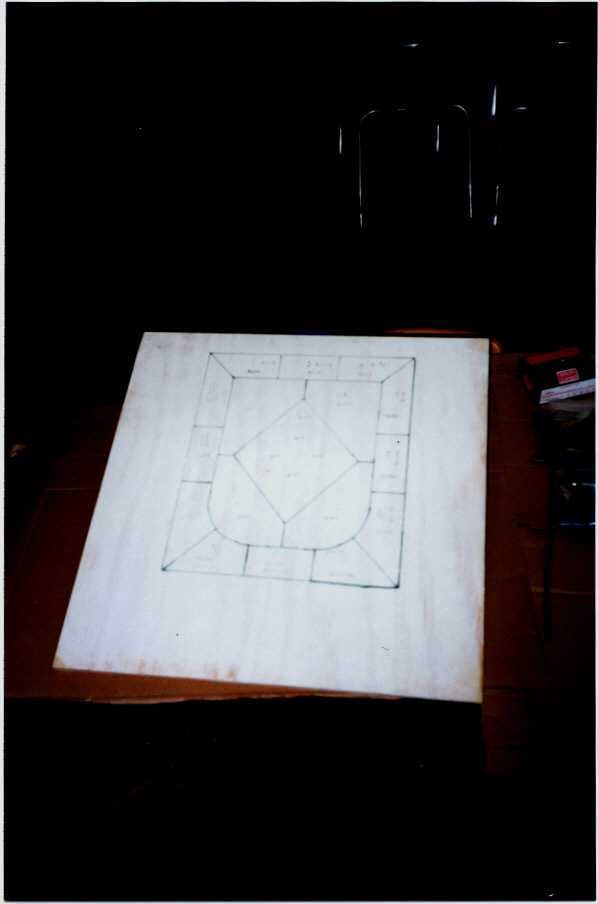
In the 12th century, they started creating the pattern by making a smooth, flat wooden board whose dimensions were such that they could work two sections of each window on it. When the board was ready, they would scrape chalk over the entire surface, sprinkle water over the board and rub this chalk and water mixture into the wood with a rag. When the board was dry, they took the measurements of a section in a window and drew it on the board with a lead or tin tipped writing instrument (called a stylus). At this point, they also drew whatever borders they wanted the window to have. After drawing the window sections and any borders that were desired, the figures and other components of the window were drawn on the board with the stylus. The lines were then carefully filled in with a red or black pigment. If the figures had robes or other such garments, the colors desired would be marked on the pattern board. Finally, anything else that required a color was marked on the pattern board.
The 20th century process for creating a pattern uses paper, pencils and markers or a computer. The pattern is drawn on the paper or with computer software. If you're working with a large pattern, it may be drawn to scale and then enlarged. The pieces of the pattern are numbered, the color of the piece marked on the pattern piece and the "grain" direction indicated. Colored glass used for stained glass in the 20th century can be a combination of 2 or more colors as well as one solid color. Sometimes the colors are mixed so that a swirled effect is made. Other times, the colors are mixed to give a streaked effect. In either case, the swirl or streak will create a "grain" which should to be taken into consideration when the piece is cut. However, this is purely for aesthetic reasons.
Once you have a pattern you're satisfied with, make 2 additional copies using transfer or carbon paper. The 2 copies should be made at the same time so that you have 2 identical copies of the original pattern. The first copy should be made on thick paper (like brown craft paper). This copy is usually used in the fitting process. The second copy is made on vellum or 100-lb. manila. This copy is cut into the individual pieces of the pattern and used for cutting the glass. The pattern is cut into its pieces using a special scissors known as a pattern shears. In order to prevent your finished product from "growing", you need to allow for the lead between the pieces. If you look at a piece of lead from the end, it will look like an "H". The crosspiece of the "H" is known as the heart. The heart is approximately 1/16" thick. The pattern shears will make the necessary allowance for the heart as you cut the pattern.
I'm using a combination of the 2 periods for this step. I designed the pattern on paper to full scale. A piece of plywood was prepared in the 12th century manner, for the experience and to be able to accurately document the process. I'm using plywood because I couldn't get a board wide enough for my pattern. The pattern was transferred to brown craft paper for the "cut apart" copy and to the prepared piece of plywood using transfer paper. A pattern shears was used to cut the pattern into its pieces.
I selected colored glass in colors that were available to the 12th century artist (black for the field, yellow for the lozenge and blue for the border). However, I painted the Maltese crosses. The cross on the lozenge (blue) was done for the experience and the crosses on the field (gold) out of necessity. I wasn't going to try to cut such small pieces for the gold crosses, nor was I going to try to design the cuts on the field to be able to fit the crosses.
Before any glass was cut, the shape and size of the piece needs to be transferred from the pattern to the glass. In the 12th century, they ground chalk in a lead pot and added water to it. Then, using brushes made from the tail of a marten, badger, squirrel or cat or the mane of a donkey, they made brushes. A piece of glass, slightly larger than the finished size was placed on top of the pattern board and the outline of the piece was traced onto the glass using the chalk and water mixture with one of the brushes that were made. If the glass was too opaque and the pattern couldn't be seen through it, the outline of the piece was traced onto a piece of clear glass. When the chalk was dry on the piece of clear glass, the piece of opaque glass was placed on top of it and both pieces were held up to the light and the pattern lines transferred to the opaque glass with the chalk and water mixture.
There are several different ways to transfer the pattern to a piece of glass in the 20th century. These include:
Which technique the artist uses depends on the artist's level of expertise and confidence in their glass cutting ability.
The process of cutting glass was, to say the least, very adventuresome in the 12th century. The glass artist used a tool made out of iron with a wooden handle fitted over the tang of the tool. The "business" end of the tool was tapered on two opposite sides and came to a chisel point. The edge of the point was rounded instead of sharp. The chisel end of the cutting tool was heated and the edge placed on the glass in the place where the glass was to be cut. A crack would appear under the tool and the artist would draw the tool over the glass following the pattern line. If a crack did not appear immediately, he would wet his finger with spit, rub his finger over the area he wanted to cut then apply the hot iron to the glass again. He would continue to do this until the crack appeared. He would be careful to place the edge of the tool so that the edge would be parallel to the line along which he wanted to cut, thereby controlling the direction the crack as best as possible. This was by no means easy to do.
We, in the 20th century, have a much easier means of cutting glass. It's called a glasscutter. Actually it should really be called a glass scorer since it really doesn't cut the glass it just scores it. In its simplest form, a glasscutter is held in the hand. A tiny wheel made of carbide steel is run along the pattern line and it scores the glass. The glass is then "broken" along the score line either with another tool or with the hands. This is known as running the score, and the tool that might be used (instead of the hands) is called running pliers.
To transfer my pattern to the glass, I hold the pattern piece on the glass (technique #3 above) because it takes less time. There are less than 15 pieces in the panel I'm making. It would take approximately 30 minutes to glue all the pattern pieces to the glass, wait for the rubber cement to dry and remove any excess cement so that my cutter wheel is not running through rubber cement. It would take about an hour to trace the outline of the pieces onto the glass. Additionally, I'd have to use a paint pen on the black glass, which gets messy after the first or second transfer. By just placing the pattern piece on the glass and cutting around it, I'm saving at least 30 minutes. Think about how much time I'd save on a window that has 500 pieces! Needless to say, I'm using 20th century techniques to cut my glass.
Fitting the Glass to the Pattern
In the 12th century, the glass artists used a tool they called a grozing iron. This tool looks like a pair of pliers. The insides of the jaws are flat with the area toward the front serrated. The tool is used to trim the glass to fit the pattern by employing a rocking motion with the grozing pliers on the edge of the glass.
The grozing pliers are still in use in the 20th century. However, the problem with using grozing pliers is that it leaves a rough edge on the glass. In lead came work, this is not too much of a problem because the lead hides the jagged edge. The primary tool in the 20th century for fine fitting a pattern piece to a pattern is the glass grinder. This is a power tool that has a diamond impregnated router bit which spins at 3600 RPM and gives the edge of the glass a nice smooth finish.
I'm using the 12th century technique of using grozing pliers to fine fit the pattern piece to the pattern.
The colors in a stained glass window come from the light that passes through the glass. The object of painting on glass is to basically prevent light from passing through. The thicker the coat of paint on the glass, the less light passes through it. Thus, varying the opaqueness and translucence of the glass with the paint can create shadows and highlights. Also, figures can be made to "e;stand out"e; on the glass by applying a thick coat of the paint to the outline of the figure, obscuring the underlying color of the glass altogether. A pattern of lines of scrollwork on the glass added decoration but also served to reduce the dominating brilliance of the glass. Painting on glass whether shaded or not is called matting.
The 12th century glass artist made his own paints (Theophilus calls them pigments). The first step was to create a pigment of equal parts of copper, green glass and blue glass. A thin copper sheet was placed in an iron pan and heated until it became a powder. The glass was ground separately then the three ingredients mixed together in equal proportions and ground with wine or urine (usually goat urine). The glass was then matted with the pigment, following the lines on the pattern board (tracing). For ease of explanation, I'll call this "e;first"e; matting the primer. If letters were desired, they simply wrote them in the pigment with the pointed handle of the brush. Scratching figures (including letters) into the matting with a sharp instrument is called scriffito.
After the primer was applied, shadows and highlights were created for robes (similar to a painting on canvas) and other areas that required it. The areas where there was a robe was smeared with the brush in such a way that the area is opaque in one part, light in another, and still lighter (translucent?) in a third. The "smearing" made it appear that there were three different colors painted side by side. This shading and highlighting was also done around eyes, nostrils and chins, as well as around the faces of young men and any body parts that were naked (hands, feet, etc).
When the glass was dry, the glass artist would paint the background and add any embellishments that were required. The areas of the glass not affected with shading and highlighting were covered with a light pigment. Not as light as the lightest shaded area and not as "dark" as the middle shaded area, but somewhere in between. Although this is still considered to be matting, I'll call it the background to differentiate from the primer. When this was dry, the scriffito technique was used to make fine lines on each side close to the first shadow, allowing narrow strips of the background to remain between the lines and the first shadow. Flowers, branches, leaves or small animals or birds were painted on letters as they were in manuscripts. Any exposed body part (faces, hands, feet, limbs) were painted with this background pigment.
When all the glass has been painted, the glass was placed in a kiln to set the pigments to the glass. An iron plate that fit into the kiln was sprinkled with dry quicklime or ashes. When there was a coating of this "the thickness of a straw"6 on the iron plate, it was pressed with a smooth board. The pieces of glass were carefully placed on this, close together, with the green and blue glass on the outside and the white, yellow and purple glass towards the middle, these being more resistant to fire. The kiln was fueled by wood (smoked beechwood). "Now take some beechwood logs that have been well dried in smoke and kindle a moderate file in the kiln, and then later a bigger one until you see the flame rising at the back and on each side between the kiln [walls] and the iron plate and, by passing over the glass and licking it, so to speak, covering it long enough to make it slightly red-hot."6. When the glass reached red-hot, the wood was removed immediately and all air holes in the kiln were carefully blocked. The glass stayed in the kiln until the kiln cooled completely. At this point, the paint on the glass was scraped with a fingernail. If the paint didn't chip off, it was ready for the next step in the process. If it did chip off, the paint would be reapplied and the glass would be re-fired until it didn't chip. When all the pieces were sufficiently fired, they were brought back to the pattern board.
The techniques detailed above are still in practice today, with some enhancements. The pigments can be purchased, and the kiln is powered by electricity or gas (such as propane or methane) with gauges and timers, etc to let the 20th century glass artists know when the glass has been sufficiently fired. As I mentioned earlier, this is a dying art, used primarily in restoration work.
Also available are paints manufactured specifically for painting on glass that can be fired in a kitchen oven. These paints provide the hobbyist who can't afford or doesn't have the room for a firing kiln the opportunity to produce stained glass pieces that consist of both cut glass and painted glass. The painted part of my project used these types of paints.
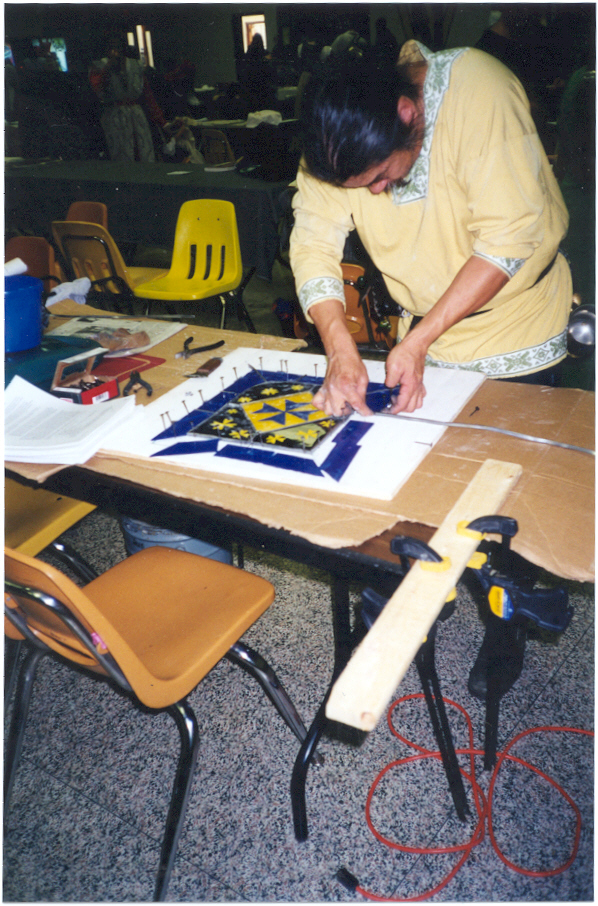
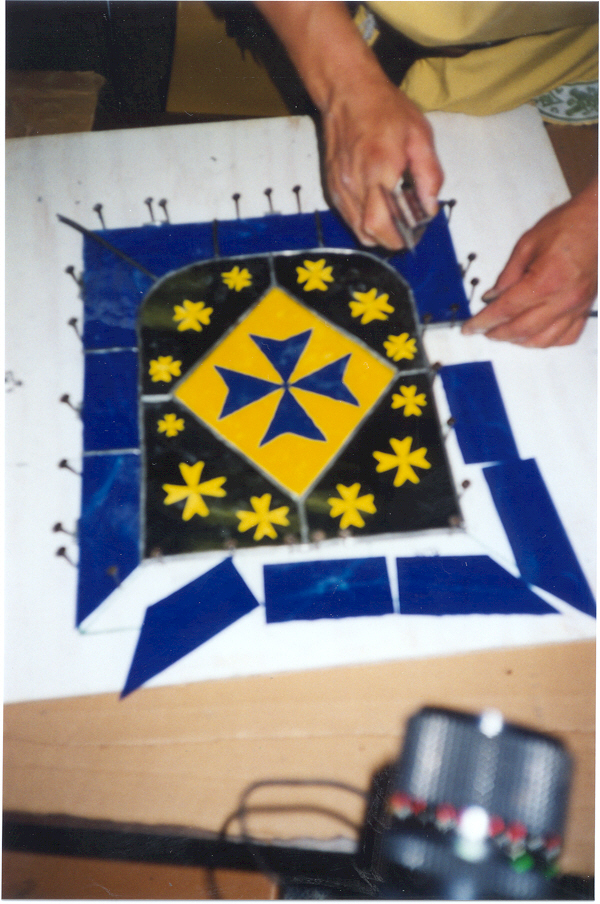
Now that the paint on the glass has been heat hardened, the window can be put together. The glass pieces are wrapped in lead strips. The lead strips have a channel in which the edge of the glass is inserted. The lead strips are called came. Nails are required at this stage. Once the pieces were wrapped in came and placed on the pattern board, the nails are hammered into the pattern board around the pattern piece to prevent from moving.
"You should have 40 nails, a finger long, slender and round at one end and at the other square and well bent outward so that a hole appears in the middle."7
A 12th century glass artist made his own lead came. He made a mold out of iron (preferred) or wood, melted pure lead and cast the came. Theophilus provides detailed instructions on how to build the molds and cast the came in chapters 24 through 26 of Book II.
Working with the pattern board, a glass piece was wrapped in lead came and carefully placed on the pattern board in its proper place. The piece was kept in place by hammering nails into the pattern board around the piece. This was repeated until all the pieces were leaded and positioned on the pattern board.
Glass artists in the 20th century buy their lead came. In addition to lead, came is available in copper, brass and zinc. The process of wrapping a piece in came and setting it on the pattern board is basically the same. The 12th century glass artist would work from the middle out as described by Theophilus7
". . . After this take up a head of a figure, wrap a lead came around it, and replace it carefully. . ."
The 20th century glass artist follows the same procedure. Actually, the glass artist will find a "key" area in which to start. This is typically an area where an intricate figure is located. Once this figure is properly fit and secured to the pattern board, the glass artist will "build out" from that area, going to the next "intricate" figure. It's far easier to adjust the size of a piece on the edge of the window than it is to adjust a piece in the middle. The piece on the edge could even be re-cut to account for a window "growing". However, both the 12th and 20th century glass artist will take great pains to make sure that this doesn't happen too often. He would also make sure that the window is plumb and square when it was complete.
I am using lead throughout the piece as they did in the 12th century. I don't need to worry about reinforcing the finished panel since I'm framing it in wood. If I weren't framing the piece in wood, I'd use zinc around the perimeter. It's a stronger, stiffer metal than lead and would provide additional support for the panel. Also, if the piece were bigger, I'd reinforce the panel with a piece of steel rebar across the middle.
In general, solder is a mixture of tin and lead. The more tin in the mixture, the lower the temperature required to melt the solder. Lead came is soldered only at the joint where 2 pieces of came meet. The molten solder flows into the joint where two pieces of came meet. To facilitate this, a caustic material called flux is used. In the 20th century, oleic acid is the preferred flux for lead came. However, a zinc chloride and ammonium chloride mixture (primarily used with the copper foil method of stained glass making) can be used. The 12th century glass artists also needed a flux. What was used is sketchy (Theophilus doesn't even mention flux) at best. I am going to make an assumption (shame on me) that the caustic material was lye. Theophilus does provide instructions on how solder was made in the 12th century (see below). The last step was to cover the solder with wax. My assumption is that the solder was coated tallow. I am further assuming that it was tallow prepared for soap making and not for candle making. The formula for soap making tallow includes lye, whereas the formula for candle making tallow does not.
Solder in the 12th century was tin that had a fifth part lead added to it (an 80/20 solder). The mixture was melted and sticks of solder were cast using the same molds that were used to cast the lead came. The soldering iron was ". . . long and thin, with a thick round end drawn out to a slender point and filed and tinned"7. The iron was heated in the fire. While the iron was heating, the glass artist would take the solder sticks that he had cast and coated them with wax (tallow?). The joints where 2 pieces of came met were scraped to remove any oxidation. Then, ". . . Pick up the hot iron and, wherever two pieces of lead meet, touch the tin to it and smear them with the iron until they stick together."7. When the entire panel has been soldered on one side, it was carefully turned over and soldered on the other side.
In the 20th century, solder is available in several different tin/lead combinations, including 50/50, 60/40, 63/37 and 100/0 (also called lead-free). The heating elements of soldering irons are made of steel or ceramic and run on electricity. A 20th century soldering iron should be at least 80 watts. In addition to the iron, a rheostat should be used to control the temperature. Soldering in the 20th century is basically the same. The soldering iron is heated until it will melt the solder (but not the lead). The came is cleaned of oxidation wherever it's going to be soldered. Flux is applied to the joint. The soldering iron is placed on the came heating (but not melting) it and the solder is placed on the tip of the iron. The solder will run down the tip of the iron onto the came.
I use a 60/40 solder for all my stained glass projects. I also use a 100-watt soldering iron with a rheostat. My flux is a commercial mixture of zinc chloride and ammonium chloride.
In general, this step serves a couple of purposes. It helps to further secure the glass in the lead came, provide some measure of weatherproofing (wind, rain, etc) and adds rigidity and strength to the window.
The technique is to "press" a substance (such as putty) under the lead came on both sides of the window that when dried will harden. To facilitate the drying and to add strength to the window, a curing agent was applied in the same manner to both sides of the window.
I'm going to make another assumption (and therefore commit another research sin) for what was used in the 12th century for this step. The research materials available to me just do not mention any type of "glazing" being done to the window. The assumption is that the material used as a "glazing compound" in the 12th century was clay-based (possibly clay used for ceramics) mixed with linseed oil. The linseed oil served 2 purposes. First it would make the glazing compound more pliable and therefore easier to work with. Second, the linseed oil could have acted as a water-repellant. The curing agent that they probably used was gypsum.
The logic behind these assumptions is:
The glazing compound used by the 20th century glass artist is petroleum based with additives like magnesium silicate and calcium carbonate included for strength and durability. Like the 12th century glass artist, the glazing putty is mixed with a little linseed oil to make it easier to work with. Since the products in the 20th century are petroleum based, the water-repellant qualities of the linseed oil doesn't matter. The mixture is "pressed" into the spaces between the glass and the lead. Then, to help cure and dry the putty, whiting powder is sprinkled on the window and brushed into the spaces between the glass and the lead. This is done on both sides. When the second side is puttied, the window is laid flat and allowed to dry for 24-48 hours.
Here also, there is little difference in the techniques used in the 12th century and the 20th century. In the 12th century, they used wood to frame the window. They probably used nails to construct it and animal hide glue if glue was used at all. To hold the window in place in the frame, they used nails driven into the wooden frame at an angle.
In addition to wood, the 20th century has metal and plastics that could be used for the frame. Screws could be used to construct the frame and better, waterproof glues are available. Glazing putty or caulking can be used to hold the window into the frame.
For my window, I'll use wood as they did in the 12th century. However, I'll use screws and yellow carpenter's glue to construct the frame. I also had someone create a rabbet in the frame to provide a "shelf" that the window could rest on. And lastly, I'll use glazing putty to hold the window in the frame.
Biography:
Jimi Lee is a systems programmer in New York City. He supports mainframe operating system and networks. In his spare time he loves making stained glass. He is apprenticed to Mr. Robert Lennox (see references), a master stained glass artist. In his spare time, Jimi works in Mr. Lennox's stained glass studio, Stained Glass Imagery on Staten Island, New York. With Robert's assistance, Jimi has improved his stained glass skills and is learning the art of stained glass restoration. Jimi has worked on the restoration of windows from St. James Episcopal Church (Newark, New Jersey) and on panels of a dome from the U.S. Patent Office (Smithsonian Museum). The windows from St James Church are over 100 years old and are reputed to have been built by Louis C. Tiffany.
Lord Conor O Ceallaigh (OSag., AoA, GrandMaster Bowman, Captain of Archers of the Crown Province of Ostgardr, East Kingdom) is the youngest son of an Irish clan chief living with a Mongol tribe (the Silver Horde) in the Crown Province of Ostgardr (East Kingdom). Seeing no means of inheriting lands or titles from his father, except by committing fratricide, he took what small inheritance he would get and struck out on his own. He was hired as a bodyguard by a French merchant woman that traded in the Far East. On one excursion to the Orient, the group of bodyguards he hired to protect his employer mutineed. Hard press, Lord Conor was able to kill the 12 guards by virtue of his archery skills. However, as he was doing this, a patrol of the Silver Horde witnessed this feat and reported it to their Khan. The Khan of the Silver Horde, impressed by the report, ordered his men to bring Lord Conor and his employer to him. After demonstrating that his prowess with the bow against the mutinying guards was no fluke, the Khan made Lord Conor an honorary member of the tribe, naming him Subedei, after a famous general and bestowing on him the title of Qorhci. This title, literally Quiver Bearer, is given to the best archer in the Horde who is responsible for all archery activities in the Horde.
References:
1The Catholic Encyclopedia - Stained Glass (www.newadvent.org/cathen/).
2Theophilus - On Divers Arts. Book II chapter 29. From the translation by John G. Hawthorne and Cyril Stanley Smith.
3Eraclius - De Coloribus et Artibus de Romanarum. 12th Century.
4For example, Peder Manssons - Schriften uber technische Chemie und Huttenwesen.
5Robert Lennox owns and operates a stained glass studio on Staten Island, NY. Included in his over 25 years of experience is stained glass restoration work on The National Cathedral in Washington, DC, Trinity Church in New York City, The US Patent Office (Smithsonian Museum) in Washington, DC and St. James Church in Newark, New Jersey.
6Theophilus - On Divers Arts. Book II chapter 23.
7Theophilus - On Divers Arts. Book II chapter 27.
8Theophilus - On Divers Arts. Book I chapters 20, 21, 25 and 27 for example.
9Theophilus - On Divers Arts. Book I chapters 1, 2, 19 and 22, Book II chapter 27 for example.
This page written by Lord Conor ©1999